Data Donation Configuration
The data donation can be configured using so-called Uploaders, Instructions, and Blueprints.
An Uploader represents an upload form through which one file can be uploaded (either a ZIP container
or a single file).
For each Uploader, a set of Instructions for participants can be created that
illustrate how they can access and upload the requested file.
A Blueprint is used to define what data will be extracted from the file
that participants upload through the Uploader. Each Uploader has one or multiple
associated Blueprints.
To configure the data donation step, go to the Project Hub and click on Data Donation in the Data Collection Configuration section which will bring you to the following page:
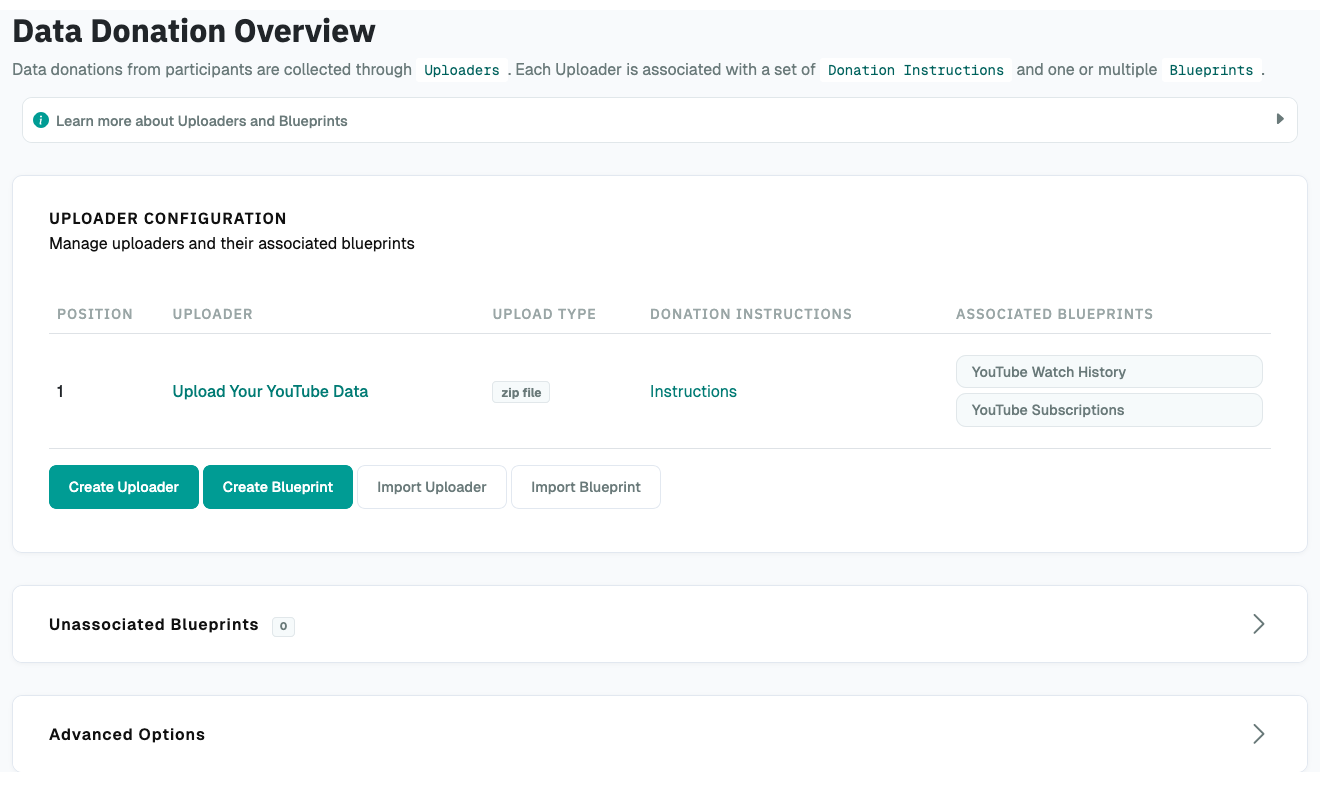
Uploader Configuration
When creating an Uploader, you have the following configuration options:
| Setting | What it's for |
|---|---|
Upload Type |
Whether to accept single file or zip file upload. |
Name |
Internal name of the uploader. |
Extract nested zip files |
Whether to extract zip files found inside the uploaded zip. |
Extraction depth |
How deep to extract nested zip files. |
Display name |
A short description of the Uploader, displayed to participants (e.g., "YouTube"). |
Display position |
Defines the display order if multiple uploaders are configured. |
All-in-one consent |
Whether to option consent per Blueprint or for all extracted data at once. |
Setting Details
Upload Type
Either "single file" or "zip file" depending on whether your participants are expected to upload a single file (e.g., CSV or JSON File) or a ZIP-container.
Name
Internal name of the Uploader. Must be unique per project.
Extract nested zip files
Whether to extract zip files found inside the uploaded zip and make their contents available to be handled by donation blueprints.
Extraction depth
Maximum levels of nested zip files to extract (0 = only extract the top-level zip).
Note
If Extract nested zip file is selected, the File Uploader will look inside any zip files
contained within the main file that participants upload and make those contents available
for extraction through a Donation Blueprint too.
You can control how many levels deep this works—for example, a depth of 1 means it will open any zip inside the main zip, but stop there.
The paths of the extracted files will reflect the archive structure. For a file inside the main zip, the path is simply the filename (e.g., data.json). For a file inside a nested zip, the path includes the nested zip's name (e.g., nested.zip/inner.json).
Display name
Name displayed to participants in the header of the Uploader on the data donation page.
Display position
The position of the Uploader on the data donation page. Uploaders with a lower position will be displayed closer to the top of the page. This setting only has an effect, if you use multiple Uploaders in the same project.
All-in-one consent
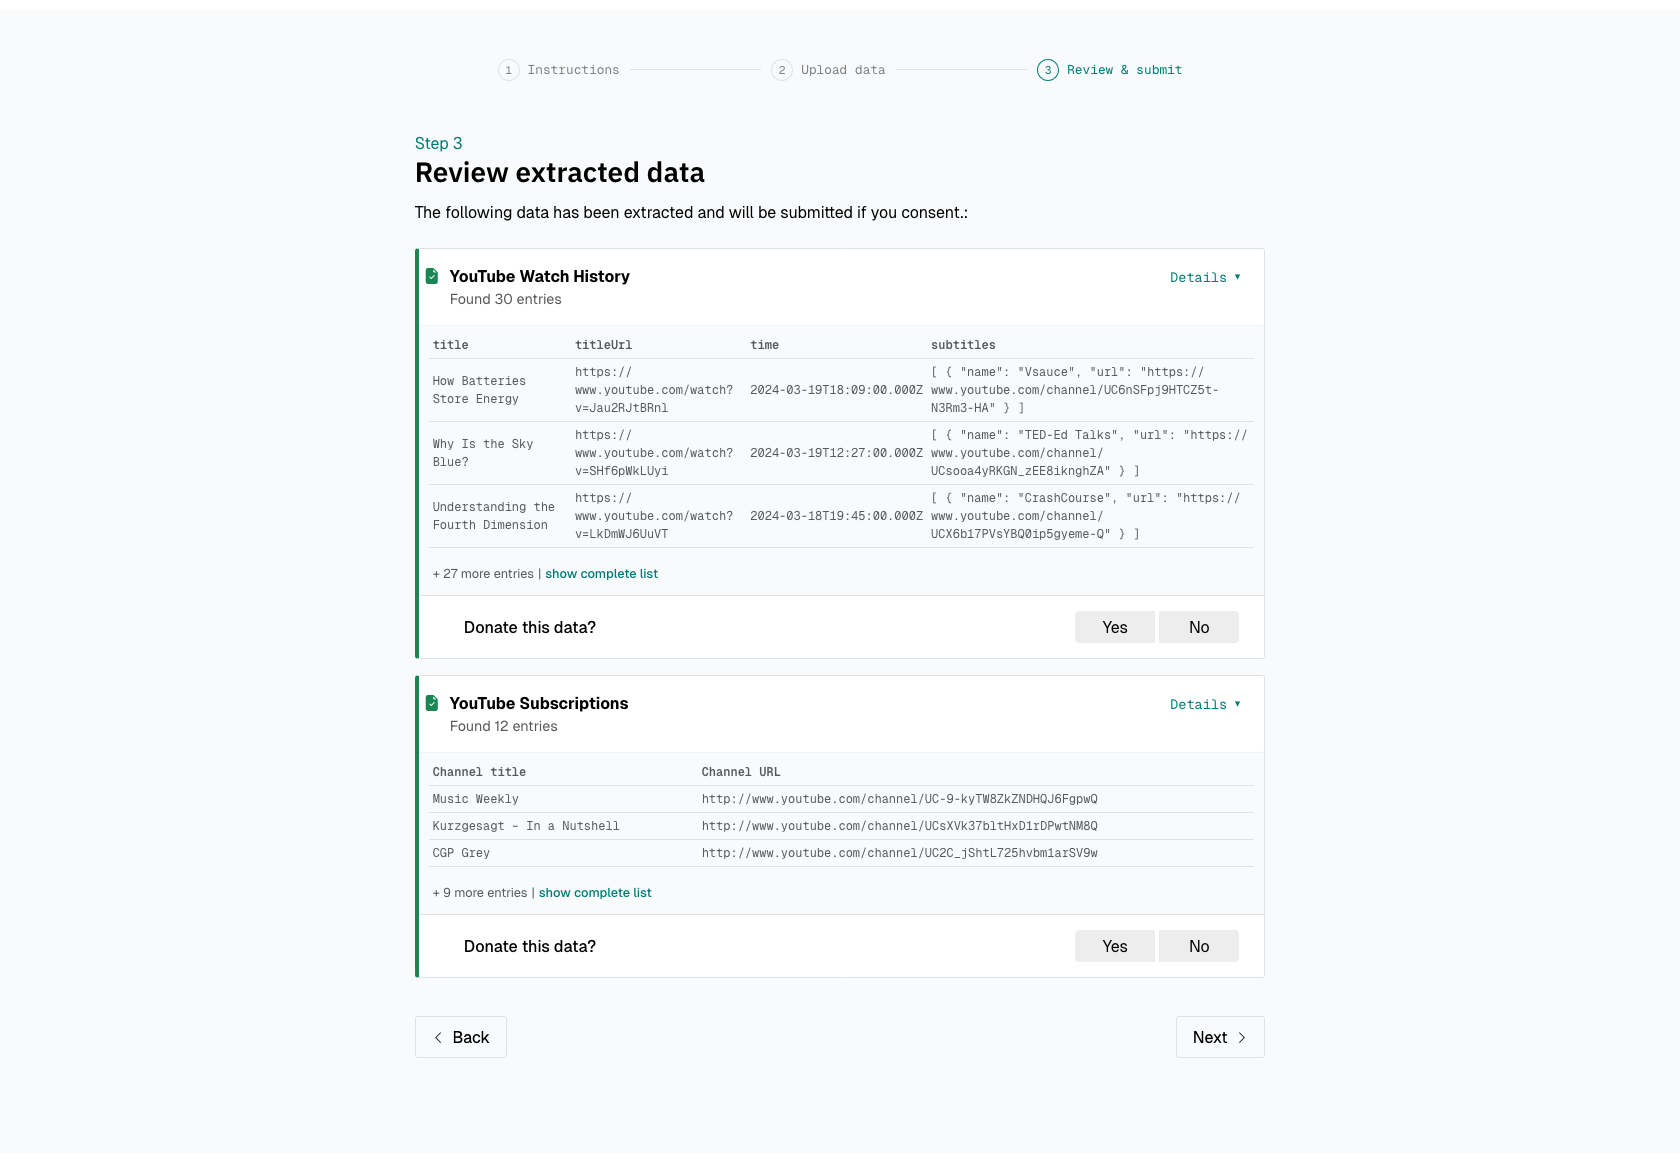
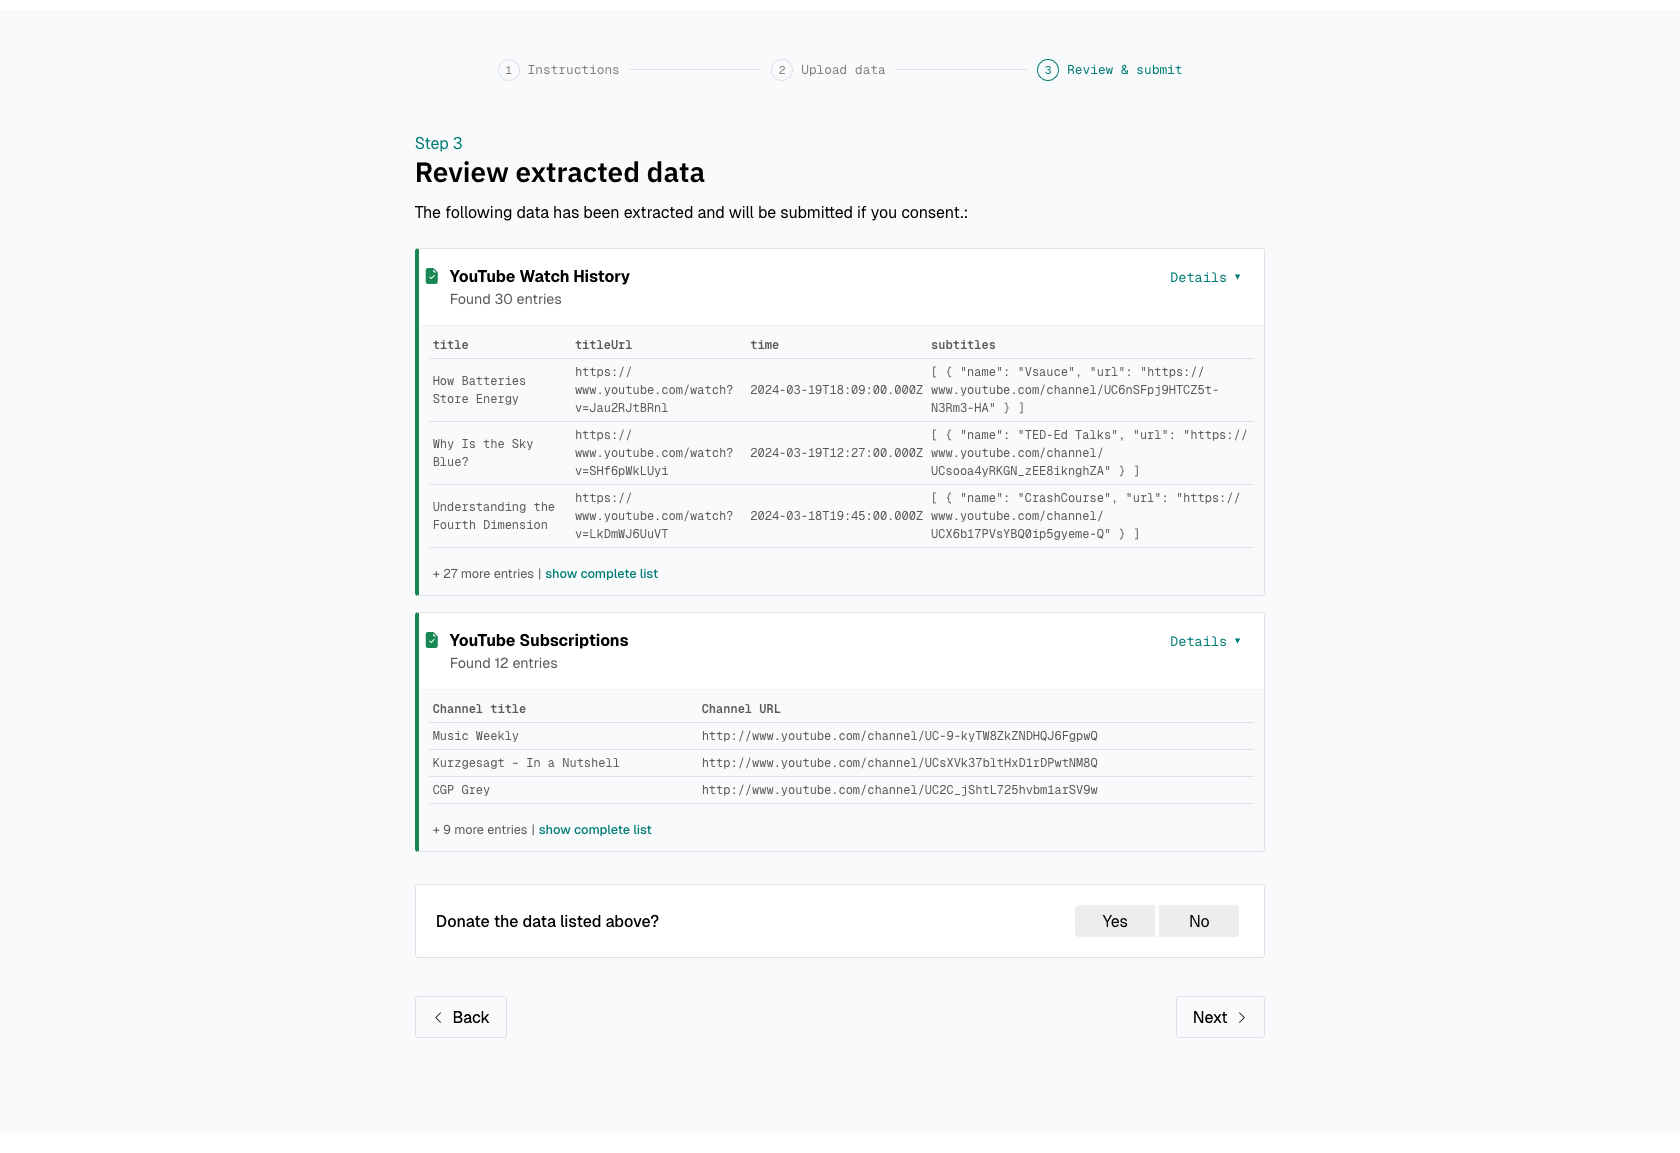
By default, participants will be asked to consent to the donation of the data associated with each Blueprint. If all-in-one consent is enabled, participants will instead be asked to consent to submit all uploaded data at once. The all-in-one consent question is displayed at the bottom of the data donation page.
All-in-one consent disabled:
All-in-one consent enabled:
Instruction Configuration
Once an Uploader is created, you can add Instructions to it. Donation Instructions consist of one or multiple instruction pages. Instruction pages are displayed page-by-page and participants navigate them with "next"/"back" buttons.
Note
If no instructions are defined for an Uploader, the instruction step will be hidden in the participation view.
For each instruction page, you have the following configuration options:
| Setting | What it's for |
|---|---|
Text |
The instruction text displayed to the participants. |
Page number |
The order of the page in the slideshow. |
Setting Details
Text
The instruction text displayed to the participants. Can also upload and include images or gifs to guide participants through the data donation process in this field.
Tip
The participant's external ID is available as a template variable to be included
in the instruction text as follows: {{ participant_id }} which will be displayed
to the participant as something like IPI2wHDWrHODDRKuo8zo101S. This is
helpful to enable participants to continue the data donation at a later point in time
(e.g., because it can take some time between requesting data takeout and being
able to download it); read this section of the documentation to find out how
this can be done.
Page number
The order of the page in the slideshow.
Blueprint Configuration
When creating a Blueprint, you have the following configuration options:
General Settings
| Setting | What it's for |
|---|---|
Name |
Internal name of the Blueprint. |
Associated Uploader |
The Uploader to which the Blueprint is associated. |
Setting Details
Name
Internal name of the Blueprint. Will not be publicly visible to participants.
Associated Uploader
The Uploader to which the Blueprint is associated.
Display Settings
| Setting | What it's for |
|---|---|
Display name |
Name displayed to participants on the data donation page. |
Description |
Description of what information the Blueprint will extract from the uploaded file. |
Display order |
Sets the display order for this Blueprint in the participation interface. |
Setting Details
Display name
Name displayed to participants on the data donation page. Will be publicly visible to participants. Therefore, it is important to define a meaningful name (e.g., "Watch History", "Liked Posts" or similar).
Description
Description of what information the Blueprint will extract from the uploaded file (e.g., "Date when you watched a video and the link to the video"). If defined, the description will be visible for participants in the data donation step.
Display order
Sets the display order for this Blueprint in the participation interface. Blueprints are shown in ascending order by this value. If multiple Blueprints have the same order value, they will be ordered by creation date (oldest first).
Data Extraction Configuration
| Setting | What it's for |
|---|---|
File paths |
Specify the path to the file you want to extract from the uploaded zip. |
Expected File Format |
The file format of the file from which information should be extracted. |
Expected fields |
The fields that must be contained in the file from which information should be extracted. |
Expected field regex matching |
Select if you use a regex expression in the Expected fields setting. |
Array join separator |
The separator used to combine multiple values of a field into one text. |
Setting Details
File paths
Specify the path to the file you want to extract from the uploaded zip
(Only necessary, if the Blueprint is associated to an Uploader that expects a ZIP file).
For example, if the file is some_data.json at the root of the zip, enter some_data.json.
Matching works from the right: data.json will match both
root/data.json and root/some-folder/data.json, selecting the first match.
Be specific enough to avoid unintended matches.
You can also use regex patterns or define multiple paths, which are tried in priority order (lower numbers first; useful if the filename may not always be the same).
If a path matches more than one file, DDM processes and extracts the data of all matched files consecutively.
Therefore, we recommend to be as specific as possible when setting the file path.
Tip
Examples for regex paths to match files
| Regex | Description |
|---|---|
^MyActivities\.json |
Matches a file named MyActivities.json that is located at the root of the ZIP file. |
^SpecificFolder/MyActivities\.json |
Matches a file named MyActivities.json that is located in a folder named SpecificFolder in the root of the ZIP file. |
.*/MyActivities\.json |
Matches the first file with the name MyActivities.json that can be located anywhere in the ZIP file. |
(\^MyActivities\.json\|^MeineAktivitäten\.json\|^MieAttivita\.json) |
Matches a file that is located at the root of the ZIP file and either named MyActivities.json, MeineAktivitäten.json, or MieAttivita.json. Can be helpful to match the same file in different languages. |
You can find about more about regex here. On this website, you will also find some Tools that can help you test regex patterns.
If you have the extraction of nested zip-files enabled, see the File Uploader settings above for how to define paths to nested zip-files.
Expected File Format
The file format of the file from which information should be extracted. Currently, only JSON and CSV is implemented.
Expected fields
The fields that must be contained in the file from which information should be extracted.
If a file does not contain all fields defined here, No Information will be extracted.
Put the field names in double quotes (") and separate them with commas ("Field A", "Field B").
You can also use regular expressions (regex) to match expected fields - for this, you
must enable the expected field regex matching option (see below).
Expected field regex matching
Select if you use a regex expression in the Expected fields
setting.
Array join separator
If an extracted field contains several separate values
(e.g. multiple lines of a message) instead of a single value, they are combined
into one text using this separator. Defaults to \n, i.e., joining them with a
line break. E.g., an entry ["A", "B"] becomes "A\nB".
JSON specific settings
| Setting | What it's for |
|---|---|
Extraction Root |
Indicates on which level of the file's data structure information should be extracted. |
Setting Details
Extraction Root
Indicates on which level of the files' data structure information
should be extracted. If you want to extract information contained on the first
level (e.g., {'field to be extracted': value}, you can leave this field empty.
If you want to extract data located on a higher level, then you would provide
the path to the parent field of the data you want to extract (e.g., if your json
file is structured like this {'friends': {'real_friends': [{'name to extract':
name, 'date to extract': date}], 'fake friends': [{'name': name, 'date': date }]}}
and you want to extract the names and dates of real_friends, you would set the
extraction root to friends.real_friends.
Extracting Nested Loop Settings
Sometimes each item in your data contains a list of related sub-items that you also want to extract as their own rows, instead of one row per top-level item. For example, a ChatGPT conversation export is roughly structured like this: each conversation has a few top-level fields, plus a list of the individual messages exchanged in it.
Note
Example
    [
      {
        "conversation_id": "conv-1",
        "title": "Weekend Trip Ideas",
        "mapping": [
          {
            "message": {
              "author": "user",
              "content": "Where should we go this weekend?"
            }
          },
          {
            "message": {
              "author": "assistant",
              "content": "How about a hike near the lake?"
            }
          }
        ]
      },
      {
        "conversation_id": "conv-2",
        "title": "Restaurant Ideas",
        "mapping": [
          {
            "message": {
              "author": "assistant",
              "content": "some content 2"
            }
          }
        ]
      }
    ]
Without a nested loop configured, DDM only sees the top-level fields
(conversation_id, title) — you'd get one row per conversation, with no
straightforward way to also pull out the individual messages (in the example
contained in mapping).
By setting Nested loop path to mapping, you tell DDM to also loop over
each conversation's messages and turn every message into its own row,
automatically repeating that conversation's fields on each one:
| conversation_id | title | author | content |
|---|---|---|---|
| conv-1 | Weekend Trip Ideas | user | Where should we go this weekend? |
| conv-1 | Weekend Trip Ideas | assistant | How about a hike near the lake? |
| conv-2 | Restaurant Ideas | assistant | some content 2 |
This approach also works if mapping in the example is not a list but a
dictionary-like object. E.g.:
    [
      {
        "conversation_id": "conv-1",
        "title": "Weekend Trip Ideas",
        "mapping": {
          "some_uuid": {
            "message": {
              "author": "user",
              "content": "some content"
            }
          }
        }
      }
      ...
    ]
In this case, DDM just ignores the key of the entries contained in mapping and
iterates over the values (i.e., "message": { "author": "user" } ...).
| Setting | What it's for |
|---|---|
Nested loop path |
The field that holds the list of sub-items you want to extract as separate rows. |
Nested expected fields |
The fields that a sub-item must contain in order to be extracted. |
Nested expected fields use regex matching |
Select if you use a regex expression in Nested expected fields. |
Group entries by parent item |
Whether to group and display extracted sub-items by their parent item. |
Allow item exclusion |
Whether participants can remove individual items from their donation. |
Setting Details
Nested loop path
The field that holds the list of sub-items you want to
extract as separate rows (e.g. mapping). Leave empty if you don't need
this (the default) — in that case, the settings below have no effect. To
reach a field nested inside another field, separate the names with a dot,
e.g. data.mapping. To then extract, e.g. in the example above, the message
contents and authors, you will define message.author and message.content
as relevant nested fields (see the section on Relevant Fields below).
Nested expected fields
The fields that a sub-item must contain in order
to be extracted. Works just like the top-level Expected fields setting,
except it's checked per sub-item rather than per top-level item: a sub-item
missing any of these fields is skipped, but the rest of its conversation
(or other top-level item) is still processed normally.
Put the field names in double quotes and separate them with commas
("Field A", "Field B"). Only used if Nested loop path is set.
Nested expected fields use regex matching
Select if you use a regex
expression in Nested expected fields, the same way
Expected field regex matching applies to the top-level Expected fields.
Group entries by parent item
By default, all extracted sub-items (e.g. every
message from every conversation) are shown to participants combined in one
long list. Enable this to instead group and display them by their parent
item — e.g. all of one conversation's messages shown together as a single
entry, with the conversation's own fields (like title) shown once above
them. Requires Nested loop path to be set.
Allow item exclusion
If enabled, participants can remove
individual items (e.g. a single conversation) from their donation before
submitting, instead of only being able to consent or decline for the whole
Blueprint at once. Requires Group entries by parent item to be enabled.
Note
All settings in this section only apply to JSON blueprints with a
Nested loop path configured; Allow item exclusion additionally
requires Group entries by parent item to be enabled.
CSV specific settings
| Setting | What it's for |
|---|---|
CSV Delimiter |
The character that separates values in the expected CSV file. |
Setting Details
CSV Delimiter
This field allows you to specify the character that separates values in the
expected CSV file (e.g., ,, ; or \t). If left empty, DDM will try to infer the delimiter from the file structure.
TXT specific settings
| Setting | What it's for |
|---|---|
Record separator |
The character sequence that marks the boundary between individual records. |
Field separator |
The character sequence that separates individual fields within a record. |
Key-value separator |
The character that separates a field's name from its value within a line. |
Skip header lines |
The number of lines to skip at the beginning of the file. |
Skip footer lines |
The number of lines to skip at the end of the file. |
Ignore blank lines |
Whether empty lines within a record are ignored. |
Trim whitespace |
Whether leading/trailing whitespace is removed from records and key-value pairs. |
Setting Details
Record separator
The character sequence that marks the boundary between
individual records/entries in the file (e.g., a blank line or a single line
break). Use \n for a line break or \n\n for a blank line.
Field separator
The character sequence that separates individual fields
within a single record (e.g., a line break if each field is on its own line).
Use \n for a line break.
Key-value separator
The character that separates a field's name from its
value within a line (e.g., : in Name: John, or = in name=John).
Note
Example
Given a TXT file structured like this:
Datum: 2026-04-01 14:09:16 UTC
Link: https://example.com/video/1

Datum: 2026-04-02 15:30:48 UTC
Link: https://example.com/video/2
with Record separator set to \n\n (blank line), Field separator set
to \n (line break) and Key-value separator set to :, DDM extracts two records,
each containing a Datum and a Link field.
Note
When entering Record separator or Field separator, type \n (backslash
followed by "n") to represent a line break, and \n\n for a blank line — DDM
automatically converts these into actual line breaks internally. Do not paste
an actual line break into the field.
Skip header lines
The number of lines to skip at the beginning of the TXT file before processing begins (e.g., to ignore a title or metadata block).
Skip footer lines
The number of lines to skip at the end of the TXT file (e.g., to ignore a trailing summary or signature block).
Ignore blank lines
If enabled, empty lines within a record are ignored rather than treated as part of the field data.
Trim whitespace
If enabled, leading and trailing whitespace is removed from each record and from each key-value pair before extraction.
Relevant Fields
The settings above are used to identify and validate the file from which data should be extracted. Once file validation succeeds, the blueprint starts extracting information from the file.
To do this, you need to define which fields to keep in the extracted data. Optionally, you can also rename fields during extraction — this is especially useful when using regex matching, where you want a clean, predictable field name in the exported data rather than the raw matched name.
To define a field, provide:
| Setting | What it's for |
|---|---|
Expected name |
The field/variable name expected to be contained in the uploaded file. |
Match regex |
Enable this if expected name is a regex pattern rather than an exact field name. |
Rename to |
Optionally, the name the matched field should be renamed to in the extracted data. |
Keep in donation |
Whether the field should be included in the donation. |
Setting Details
Expected name
The field/variable name expected to be contained in the uploaded file. This can be an exact name, or a regex pattern (e.g., to match across different translations of the same field).
Match regex
Enable this if expected name is a regex pattern rather than
an exact field name.
Rename to
Optionally, provide the name the matched field should be renamed
to in the extracted data. If left empty, the name from expected name is
used as-is.
Keep in donation
Enable this if the field should be included in the donation (i.e., submitted to you as part of the participant's donation).
Extraction Rules
Data extraction is performed using Extraction Rules, which are applied to
the file one after another, in the order you define.
| Setting | What it's for |
|---|---|
Execution Order |
The order in which the extraction rules are applied to the file. |
Name |
The name of the extraction rule, for internal organization only. |
Field |
The field the rule applies to. |
Extraction Operator |
Defines the main logic of the extraction step. |
Comparison Value |
The value against which the field's data is compared, according to the selected Extraction Operator. |
Replacement Value |
Only required for "Replace match (regex)": the value used as a replacement when the pattern matches. |
Setting Details
Execution Order
The order in which the extraction rules are applied to the file.
Name
The name of the extraction rule. For internal organization only — this is not the field name itself.
Field
The field the rule applies to. This must match either the
expected name set in the Extraction Fields section, or, if provided, its
rename to value.
Extraction Operator
Defines the main logic of the extraction step. Below, you see the list of available extraction operators:
| Extraction Operator | Description | Note |
|---|---|---|
| Keep Field | Keep this field in the uploaded data. | – |
| Equal (==) | Delete row/entry if the value contained in the given field equals the comparison value. |
Works for strings, integers, and dates^1^. |
| Not Equal (!=) | Delete row/entry if the value contained in the given field does not equal the comparison value. |
Works for strings, integers, and dates^1^. |
| Greater than (>) | Delete row/entry if the value contained in the given field is greater than the comparison value. |
Works for integers and dates^1^. String values are skipped and the row will be kept in the data. |
| Smaller than (<) | Delete row/entry if the value contained in the given field is smaller than the comparison value. |
Works for integers and dates^1^. String values are skipped and the row will be kept in the data. |
| Greater than or equal (>=) | Delete row/entry if the value contained in the given field is greater than or equal to the comparison value. |
Works for integers and dates^1^. String values are skipped and the row will be kept in the data. |
| Smaller than or equal (<=) | Delete row/entry if the value contained in the given field is smaller than or equal to the comparison value. |
Works for integers and dates^1^. String values are skipped and the row will be kept in the data. |
| Delete match (regex) | Delete parts of the value contained in the given field that match the given regular expression (regex) (e.g., if the regular expression (regex) = "^Watched " and a field contains the value "Watched video XY" the following value will be kept in the uploaded data: "video XY"). |
All field values are converted to strings before this operation is applied. |
| Replace match (regex) | Replace parts of the value contained in the given field that match the given regular expression (regex) (e.g., if the regular expression (regex) = "[\w-.]+@([\w-]+.)+[\w-]{2,4}" and the replacement value = "anonymized" and a field contains the value "some text email@address.com" the following value will be kept in the uploaded data: "some text anonymized"). |
All field values are converted to strings before this operation is applied. |
| Delete row when match (regex) | Delete row/entry if the value contained in the given field matches the given regular expression (regex) (e.g., if regular expression (regex) = "^Watched " and a field contains the value "Watched video XY" the row/entry will be deleted from the uploaded data). |
All field values are converted to strings before this operation is applied. |
[small]#^1^ Dates are inferred from string values if they are formatted according to ISO, RFC2822, or HTTP standards, and only if both the field value and the comparison value follow the same format. Otherwise, the entry will be treated as a regular string.#
Comparison Value
The value against which the data contained in the indicated field will be compared according to the selected Extraction Operator.
Replacement Value
Only required for operation "Replace match (regex)". The value that will be used as a replacement if the regex pattern matches.
Backup blueprints (advanced settings)
A backup blueprint acts as a fallback: if a blueprint's parser fails to extract data from a participant's file (e.g., because the file cannot be identified, or the data extraction produces an error) DDM will try its backup blueprints instead. This is useful for handling files whose structure occasionally varies (e.g. a platform export format that changes over time), without having to guess a single configuration that covers every case.
| Setting | What it's for |
|---|---|
Backup for |
The primary blueprint that this blueprint should act as a backup for. |
Backup priority |
If a primary blueprint has more than one backup, the order in which they are tried. |
Setting Details
Backup for
Selects the primary blueprint that this blueprint should act as a backup for. Leave empty if this blueprint is not a backup. Only blueprints using the same File Uploader (and belonging to the same project) are available for selection; a blueprint that is itself a backup cannot be selected here — backups cannot be chained.
Backup priority
If a primary blueprint has more than one backup, this number determines the order in which they are tried. Lower values are tried first.
Note
A backup blueprint is only used if the primary blueprint's parser fails to extract data. If the primary blueprint succeeds, its backups are never attempted, even if they are configured.
Example
Suppose Watch History is a primary blueprint expecting a JSON export, and
the platform occasionally changes its export format in a way that breaks
extraction. A second blueprint, Watch History (legacy format), can be
configured with Backup for set to Watch History and used as a fallback:
if the primary JSON structure fails to parse, DDM automatically tries the
legacy-format blueprint instead (e.g., TXT), and participants see the result of
whichever blueprint succeeded.
If multiple backups are configured for the same primary blueprint, set
Backup priority on each to control the order they are attempted in (e.g.
0 for the first fallback, 1 for the second).
Advanced Options
Under advanced options, the Uploader translations can be edited. This gives you control over the text labels of the Uploaders displayed in the participant interface. If there are multiple Uploaders configured for one project, this will affect all Uploaders.